Flushing Coolant
Flushing the cooling system includes the following steps.
- STEP 1 Drain the system (dispose of the old coolant correctly).
- STEP 2 Fill the system with clean water and flushing/cleaning chemical.
- STEP 3 Start the engine until it reaches operating temperature with the heater on.
- STEP 4 Drain the system and fill with clean water.
- STEP 5 Repeat until drain water runs clear (any remaining flush agent will upset pH).
- STEP 6 Fill the system with 50/50 antifreeze/water mix or premixed coolant.
- STEP 7 Start the engine until it reaches operating temperature with the heater on.
- STEP 8 Adjust coolant level as needed.
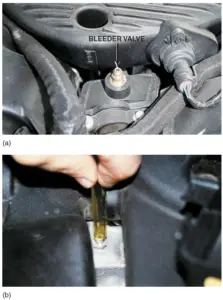
Bleeding the air out of the cooling system is important because air can prevent proper operation of the heater and can cause the engine to overheat. Use a clear hose attached to the bleeder valve and the other end in a “suitable” container. This prevents coolant from getting on the engine and gives the technician a visual clue as to the color of coolant.
Check service information for specific bleeding procedures and location of the air bleeder fittings.

(a) Many vehicle manufacturers recommend that the bleeder valve be opened whenever refilling the coolant system. (b) Chrysler recommends that a clear plastic hose (1/4 in. ID) be attached to the bleeder valve and directed into a suitable container to keep from spilling coolant onto the ground and on the engine and to allow the technician to observe the flow of coolant for any remaining oil bubbles.
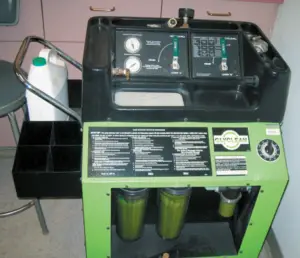
Coolant Exchange Machine
Many coolant exchange machines are able to perform one or more of the following operations.
- Exchange old coolant with new coolant
- Flush the cooling system
- Pressure or vacuum check the cooling system for leaks
The use of a coolant exchange machine pulls a vacuum on the cooling system which helps illuminate air pockets from forming during coolant replacement. If an air pocket were to occur, the following symptoms may occur.
- Lack of heat from the heater. Air rises and can form in the heater core, which will prevent coolant from flowing.
Overheating. The engine can overheat due to the lack of proper coolant flow through the system. Always follow the operating instructions for the coolant exchange machine being used.

Using a coolant exchange machine helps eliminate the problem of air getting into the system which can cause overheating or lack of heat due to air pockets getting trapped in the system.
Hose Inspection
Coolant system hoses are critical to engine cooling. As the hoses get old, they become either soft or brittle and sometimes swell in diameter. Their condition depends on their material and on the engine service conditions. If a hose breaks while the engine is running, all coolant will be lost. A hose should be replaced any time it appears to be abnormal.
- HINT: To make hose removal easier and to avoid possible damage to the radiator, use a utility knife and slit the hose lengthwise. Then simply peel the hose off.
The hose and hose clamp should be positioned so that the clamp is close to the bead on the neck. This is especially important on aluminum hose necks to avoid corrosion. When the hoses are in place and the drain petcock is closed, the cooling system can be refilled with the correct coolant mixture.
Next Steps towards ASE Certification
Now that you’re familiar with Heater Cores: Problem Diagnosis, Inspection, Pressure, and Dye Testing, try out our free Automotive Service Excellence Tests to see how much you know!
![ASE Certification Training HQ - Free ASE Practice Tests [Updated 2021]](https://asecertificationtraining.com/wp-content/themes/simplefolio/images/ASE Certification Logo.png)
