ASE Certification Training Headquarters

Online ASE Certification Training and Career Center

Welcome to ASE Certification Training Headquarters! We have everything you need to make your life easier as you begin your career as an Automotive Service Excellence Certified Master Mechanic. State specific training requirements, a step-by-step hiring process, potential employers, and interviews to help you get hired are just some of the helpful things you'll find here.

How hard are ASE Tests? All Tests Ranked Easiest to Hardest

Approximately two out of three technicians (67%) pass their ASE exam on their first attempt.  But by taking practice tests and following study guides, the rate of passing jumps to over 80%.  The tests questions can be tricky, but all questions are multiple choice.  If you have the required 2 years of hands-on experience and you are a “good test taker,” you should have no problem passing the tests on your first try.

With over 50 ASE certification tests available, it may feel overwhelming when deciding which tests to tackle first.  I’d recommend to start with some of the easier ASE tests (Spoiler Alert:  A5 – Braking Systems is a popular choice!) and then work your way to the most difficult.  This way you can get a feel for the types of questions and format of the questions and answers early on. 

I often hear a lot of the same questions from aspiring technicians who are a little nervous about taking the ASE certification tests.  Here is some information that might be able to help you feel confident about registering for the tests:

What is the easiest ASE test?

We put out a survey to over 100 ASE Master Automotive Technicians, asking them to rank the A1-A8 tests in order of easiest to hardest.  The results of the survey named a clear winner for “Easiest ASE Test,” and that is the A5 Braking Systems test.

Here are the full results of the survey with all of the A1-A9 tests ranked from Easiest to Hardest:

Test #Test NameRankingNumber of Questions# of Correct Answers to Pass (>70%)
A5Brakes#1 (Easiest)5539
A7Heating and Air Conditioning#26042
A1Engine Repair#36042
A8Engine Performance#46042
A3Manual Drive Train and Axles#55035
A6Electrical / Electronic Systems#66042
A4Suspension and Steering#75035
A2Automatic Transmission / Transaxle#86042
A9Light Vehicle Diesel Engines#96042

I recommend trying to take the exams in the order of your own experience.  You should first register for the area that you have the most experience and knowledge of so that you can get that confidence boost going into your first test.  If you feel confident in multiple areas, then I’d recommend registering for the easier tests first (see table above).

By starting with the area you have the most experience in and/or “easiest” ASE test, you can know what to expect for future exams that may be a little more difficult or in areas that you’re not as confident in.  Many technicians find they are able to “crack the code” of the multiple choice questions by recognizing patterns in the types of content being tested on and how the test writers want you to answer.  Many test takers also begin to develop a “rhythm” in understanding the content areas of the test as a whole and the pacing they need to complete all of the questions. 

Lastly, and possibly most importantly, as you take more and more tests, you will gain confidence and feel less nervous the more experience you get.  By your 3rd or 4th exam, you will be an expert test taker and many technicians report that their nervousness is completely gone!

What is the hardest ASE test?

By far the most difficult test according to our survey respondents was the A9 Test for Light Vehicle Diesel Engines.  The reason that technicians gave for the A9 test being the hardest was that it is more difficult to get experience on Diesel engines since they are less common, especially in the United States. 

Most technicians are working at a shop that primarily services gasoline combustion engines since diesel engines fell out of popularity in the late 90’s due to tightening emissions standards.  Therefore, diesel engines can be considered more specialized.  However, in the early 2000’s and on, diesel engines have started to gain popularity once again, which can definitely help you get the experience you need to ace the A9 exam!

The other good news is that the A9 test certification is NOT required in order to get your ASE Master Automotive Technician certification – only the first 8 tests in the A Series, A1 – A8 are required to be able to achieve Master Automotive Technician certification.

What Score is needed to pass the ASE test?

To pass the ASE exam, you need to get at least 70% of the questions correct.  For example, the A2 Transmission & Transaxle exam has 60 questions.  You would need to get 70% x 60 = 42 questions or more correct in order to pass.  This means you can miss up to 18 questions and still pass the exam.

Another example is the A5 Brakes test, which has 55 questions.  You need to correctly answer 70% x 55 = 39 questions in order to pass the test.  You may miss up to 16 questions and still pass.

What happens if I fail an ASE test?

It can happen to anyone – sometimes you just get unlucky with the questions or you just had a bad night’s sleep beforehand, but failing an ASE exam is just a minor setback.  There is no need to worry! The only thing you need to do is to wait at least 30 days before attempting to register again and re-take the exam. 

Don’t be too hard on yourself!  The most important thing is to keep taking steps towards your ASE certification and not to give up.  Be sure to take advantage of our FREE ASE practice tests and read reviews of our most recommended study guides to help you pass the exams, and I have confidence that you’ll be ASE certified in no time!

Study, Study, Study!

Perhaps the biggest “secret” to passing even the most difficult ASE tests is to study, study, study!  The two biggest factors in passing challenging ASE tests are:

1. The number of years of experience the technician has

2. How much the technician has studied for the exam. 

To feel 100% confident in passing, a combination of both experience and studying is highly recommended.  Practice makes perfect, and there are two main tools at your disposal.

Practice Tests

The first tool is pushing yourself to take as many practice tests as possible.  Practice tests allow you to get a great feel for how the test questions will be asked on the day of your exam.  By thinking through the problems in detail, you can begin to recognize what areas you will ace, and what areas you can do a little more studying in.

We have written completely FREE ASE practice tests that you can take to practice for the exam.  After submitting your answer, you will immediately see whether you were correct and also an explanation for the correct answer.  You can repeat the tests as many times as you would like until you are ready to pass!

Here is an example quiz question from our FREE ASE practice tests:

Your Score:  

Your Ranking:  

Was this quiz question helpful?  If so, browse our entire library of FREE ASE practice tests here.

Study Guides

Another extremely helpful tool to help you ace the exam are to purchase or borrow study guides.  They will help to cover all of the possible subjects that will be covered in each exam as well as give you tips on how the questions will be worded.  Many technicians always say that they find study guides to be the most valuable tool available.

Click here to read reviews of our most recommended study guides to help you ace the exams.

Another option for preparing to take the tests is to enroll in a local trade school or community college course to help brush up on your knowledge.  Many students find these courses to be a very helpful supplement to their on-the-job experience.  Just make sure that the school or course you enroll in is geared towards the ASE certification test and is at the appropriate level of difficulty for your experience and background.

Don’t Give Up!

Hopefully by taking on the easiest ASE tests first, you’ll be able to knock out a few tests and get a bunch of certifications under your belt before tackling the most difficult tests.  Remember, everyone moves at their own pace, and don’t be too hard on yourself.  Even if you fail a test here or there, if you keep making progress and keep your eye on the price, you’ll be certified as an ASE Master Technician in no time.

ASE Master Technician Certification – A Step-by-Step Guide

Now that you’ve achieved a few ASE Certifications, you might ask yourself… what’s next?  While achieving individual ASE certifications is certainly an accomplishment, there are many technicians who choose to take their career one step further and achieve ASE Master Technician status. 

To achieve the status of ASE Master Automobile Technician, you must achieve certification in all tests A1 through A8 in the Automobile & Light Truck, A Series.  In addition, Master Technician Status may be earned by achieving certification in all required testing areas for ANY of the following series:

  • Master Automobile Technician (A1-A8)
  • Master Collision Repair/Refinish Technician (B2-B5)
  • Master Medium/Heavy Truck Technicians (T2-T8)
  • Master Truck Equipment Technicians (E1-E3)
  • Master Transit Bus Technicians (H1 or H2 and H3-H8)
  • Master School Bus Technicians (S1-S6)

Not sure how to get ASE Certified?  Read our Ultimate Guide to Achieving ASE Certification here.  The guide will help you understand the different certifications available, work experience required, and registering, studying for, and passing your tests to achieve ASE certification!

Why Achieve Master Technician Status?

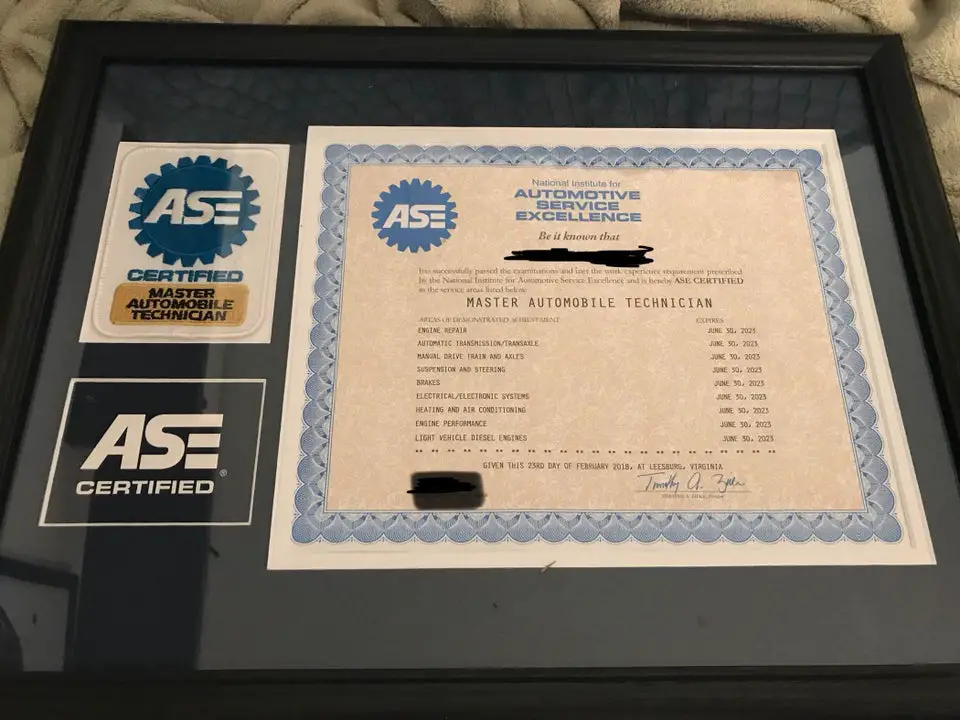
In addition to earning an awesome certificate to be proudly displayed at your shop and patch (see above), achieving Master Automobile Technician status has many numerous benefits, including:

  • Showing customers you know what you’re talking about.  Not all technicians are created equal, and customers can be skeptical.  With certifications to back-up your knowledge, customers can be put at ease knowing they will get correct, real answers from an expert.  A Master ASE certification is just another way to show “I know what I’m talking about” without having to say it.
  • Tells employers you’re committed to the industry.  Some mechanics argue that ASE certification doesn’t prove you’re technically competent, but no one can argue that it shows employers that you’re serious about the automotive service industry.  ASE Master Certification is not strictly required, but if an employer has to choose between hiring an ASE certified and non-ASE certified technician, you know who they’ll choose…
  • Get you the Salary and wage increase you deserve.  Many shops have defined salary increases directly tied to ASE certification.  Make sure you know your shop’s policies to maximize your earning potential.  If not, ASE certification can certainly be a conversation starter when negotiating a pay increase.
  • Lifelong learning.  Studying for ASE master technician certification and help you brush up on your knowledge of the automotive service industry throughout your career.  It can keep you sharp and stay up to date on ever-changing technologies and requirements. 

What is the cost to become an ASE Master Technician?

As you achieve certification in each of the required Test Series, you will have to pay for each of the exams you are registering for.  I’ve broken down the entire cost for ASE certification in this article.  

However, the quick summary is the cost of the ASE certification tests is $47 per test plus a single $34 registration fee paid with each order.  For example, taking the A1 and A2 exams would cost 2 x $47 + $34 = $128.  Although the cost seem pricey, it can more than make up in career growth and additional pay.  Some employers even pay for ASE test fees as an added benefit!

We’ve created a handy table below to quickly calculate how much it will cost to register based on the number of tests:

TestNameNumber of questions*Testing timeCost
A1Engine Repair601¼ hours$47
A2Automatic Transmission / Transaxle601¼ hours$47
A3Manual Drive Train and Axles501 hour$47
A4Suspension and Steering501 hour$47
A5Brakes551¼ hours$47
A6Electrical / Electronic Systems601½ hours$47
A7Heating and Air Conditioning601¼ hours$47
A8Engine Performance601¼ hours$47
A9Light Vehicle Diesel Engines601¼ hours$47

Which Tests Are Required for each Master Status

It can be very confusing to figure out which tests are required for each status.  You can find the list on the ASE website, but we’ve tried to make it easy for you and break it down for you by Test Series and each subject area: 

  • Master Automobile Technician (A Series)
    • A1 – Engine Repair
    • A2 – Automatic Transmission/Transaxle
    • A3 – Manual Drive Train & Axles
    • A4 – Suspension & Steering
    • A5 – Brakes
    • A6 – Electrical/Electronic Systems
    • A7 – Heating & Air Conditioning
    • A8 – Engine Performance
    • Note:  A9 is NOT required for Master Automobile Technician Status
  • Master Collision Repair/Refinish Technician (B Series)
    • B2 – Painting & Refinishing
    • B3 – Non-Structural Analysis & Damage Repair
    • B4 – Structural Analysis & Damage Repair
    • B5 – Mechanical & Electrical Components
    • Note:  B6 is NOT required for Master Collision Repair Technician Status
  • Master Medium/Heavy Truck Technicians (T Series)
    • T2 – Diesel Engines
    • T3 – Drive Train
    • T4 – Brakes
    • T5 – Suspension & Steering
    • T6 – Electrical/ Electronic Systems
    • T7 – Heating, Ventilation & Air Conditioning (HVAC)
    • T8 – Preventive Maintenance Inspection
    • Note:  T1 is NOT required for Master Medium-Heavy Truck Technician Status
  • Master Truck Equipment Technicians (E1-E3)
    • E1 – Truck Equipment Installation & Repair
    • E2 – Electrical/Electronic Systems Installation & Repair
    • E3 – Auxiliary Power Systems Installation & Repair
  • Master Transit Bus Technicians (H1 or H2 and H3-H8)
    • H1 – Compressed Natural Gas (CNG) Engines  OR  H2 – Diesel Engines
    • H3 – Drive Train
    • H4 – Brakes
    • H5 – Suspension & Steering
    • H6 – Electrical/Electronic Systems
    • H7 – Heating Ventilation & Air Conditioning (HVAC)
    • H8 – Preventive Maintenance & Inspection (PMI)
  • Master School Bus Technicians (S1-S6)
    • S1 – Body Systems & Special Equipment
    • S2 – Diesel Engines
    • S3 – Drive Train
    • S4 – Brakes
    • S5 – Suspension & Steering
    • S6 – Electrical/Electronic Systems
    • Note:  S7 is NOT required for Master School Bus Technician Status

Maintaining your Master Technician Status

Now that you’re a certified Master Technician, make sure that you maintain that status by keeping your certifications current.  All ASE credentials are valid for up to 5 years, and technicians must retest every five years to retain their certification.  The good news is that all recertification tests (A1R-A8R) are approximately half the number of questions as the initial tests for certification.

Because certifications expire after 5 years, to maintain Master Technician Certification, all Automotive / Light Truck Tests A1-A8 Recertification tests must be passed every 5 years.  Pro Tip: If you register for all recertifications in one registration window, the maximum you’ll have to pay is $175 (no limit cap on number of tests taken in 1 window).  Instead of having to pay the cost of all 9 exams is 9 x $47 + $34 = $457, you can pay just $175, which saves you $282 every 5 years.  Make sure you take advantage of this when renewing your certification!

What if one of my certifications expires? 

Although you temporarily lose Master Technician status while a credential is expired, as soon as you renew that certification your status will be valid again.  Therefore, there is no need to worry about having to start all over again!  However, it always helps to renew your certification on time to prevent any lapse in status.

Enjoy your Master Automotive Technician Status

Now that you’re officially an ASE Certified Master Automotive Technician, get the most out of your Master certification status by displaying your certificate proudly and ensure your employer and customers are aware of your credentials.  Since there are 6 Master Technician certifications, consider tackling another area of expertise within the automotive service industry.

Also, be sure to display your ASE Master Technician shoulder insignia patch, wallet I.D. card and a certificate to frame on the wall in your shop.  Master Automotive Technicians are considered to be well-rounded experts in automotive repair and service.  Master Technician Certification may be that extra push to land you that promotion, salary bump, or land your next job within the industry.

How to get ASE Certified: The Ultimate Guide (2022)

Ready to take your career as an automotive technician to the next level with ASE certification, but not quite sure how?  You’re in the right place!  There are over 315,000 ASE certified professionals in the USA, including many technicians and specialists with certifications in multiple areas.  According to the U.S. Bureau of Labor Statistics, the average ASE certified technician earns an average income of $50,518, with the highest 10 percent earning more than $68,880. 

Becoming ASE certified may feel like a daunting task.  But if you follow our step-by-step guide to ASE certification, you’ll be on your way to career growth in no time!

Step 1.  Gain Work Experience in the Field

As every mechanic knows, no amount of book knowledge can ever replace hands-on experience in the field, which is why ASE requires hands-on work experience in addition to passing tests.  The amount and type of work experience needed varies between different tests and certifications.  Use the table to determine which of the various automotive service industry work experience is required for your certification:

Certification TestMinimum amount of experienceCategory and Type of Experience Needed
Repair Technician:
G1
1 yearHands-on experience maintaining, servicing, and/or repairing light-duty or heavy-duty motor vehicles.
Repair Technician:
A1-A9, B2-B5, E1-E3, F1, H1-H8, S1-S7, T1-T8, and X1
2 yearsHands-on experience maintaining, servicing, and/or repairing light-duty or heavy-duty motor vehicles.
Repair Technician:
L1, L2, and L3
3 yearsHands-on experience maintaining, servicing, and/or repairing light-duty or heavy-duty motor vehicles.
Service Consultant:
C1
2 yearsHands-on experience as an automotive service writer/consultant or service manager.
Parts Specialist:
P1, P2, and P4
2 yearsHands-on experience as a parts counterperson or managing a wholesale or retail parts store or in-house parts department.
Collision Damage Estimator:
B6
2 yearsHands-on experience as an automotive collision damage estimator/adjuster.

You will need to submit an ASE Work Experience Form to document your work experience.  For example, if you are trying to become certified as a Repair Technician, you can get experience in a repair shop or dealership service center.  If you would like to get Collision Damage Estimator certification, you can get relevant experience in a body shop or repair shop.

The one exception to the work experience requirements in the table above is that Formal Education may be substituted for part of a Repair Technician work experience requirement per the table below. Formal Education includes high school, trade school, or community college education.

Education / TrainingCredit toward 1-year Repair Technician requirementCredit toward 2-year Repair Technician requirementCredit toward 3-year Repair Technician requirement
1) Complete any ASE-Accredited Program – Auto, M/H Truck or Collision-Refinish, including MLR, AST, MAST and all other current or grandfathered ASE standards6 months1 year1 year
-or- 2) Complete an ASE-Accredited OEM-Sponsored Co-op Program1 year2 years2 years
-or- 3) Pass 3 or more different ASE Entry-Level Certification Program Tests6 months1 year1 year
-or- 4) All other training: 2 months of full-time training (or 200 program hours) equals 1 month creditUp to 6 monthsUp to 1 yearUp to 1 year

A few more notes about work experience (does not apply to most people):

  • The two-year work experience requirement can be waived if you complete a 3 to 4 year apprenticeship program or a two year co-op program
  • The ASE also offers a student ASE program.  Through this program, you can take ASE tests and pass them while still in school and receive an student ASE certification.  Once you finish the school program or gain the two year experience requirement, you will be given the full ASE certification at that time.

Lastly, if you do not have the required work experience, you may still register for and take tests.  If you choose this route, you will receive a final test score, but you will not earn certification or receive certificates until you complete the experience requirement.

Step 2:  Study for the ASE Tests

Now that you’ve chosen which certification to apply for and completed your required work experience, the next step is to hit the books!  The good news is that we have completely FREE ASE practice tests that you can take to practice for the exam.  After submitting your answer, you will immediately see whether you were correct and also an explanation for the correct answer.  You can repeat the tests as many times as you would like until you are ready to pass!

Here is an example of a quiz question from our ASE practice tests:

Your Score:  

Your Ranking:  

Was this quiz question helpful?  If so, browse our entire library of FREE ASE practice tests here.

Another extremely helpful tool to help you ace the exam are to purchase or borrow study guides.  They will help to cover all of the possible subjects that will be covered in each exam as well as give you tips on how the questions will be worded.  Many technicians always say that they find study guides to be the most valuable tool available.

Click here to read reviews of our most recommended study guides to help you ace the exams.

Another option for preparing to take the tests is to enroll in a local trade school or community college course to help brush up on your knowledge.  Many students find these courses to be a very helpful supplement to their on-the-job experience.  Just make sure that the school or course you enroll in is geared towards the ASE certification test and is at the appropriate level of difficulty for your experience and background.

Step 3:  Take the ASE Exams

Register for your ASE Tests

After all of that experience and studying, it’s time to show off your knowledge by taking the official ASE Exams.  The first step is to register for your Tests Series that you are applying for.  You can register on the official ASE site

Below are all of the Tests Series offered by the ASE:

  • Automobile & Light Truck Certification Tests (A Series)
  • Collision Repair & Refinish Certification Tests (B Series)
  • Damage Analysis & Estimating Certification Test (B6)
  • Automobile Service Consultant Certification Test (C1)
  • Truck Equipment Certification Tests (E Series)
  • Alternate Fuels Certification Test (F1)
  • Auto Maintenance and Light Repair Certification Test (G1)
  • Transit Bus Certification Tests (H Series)
  • Advanced Engine Performance Specialist Certification Test (L1)
  • Electronic Diesel Engine Diagnosis Specialist Certification Test (L2)
  • Light Duty Hybrid/Electric Vehicle Specialist Test (L3)
  • Engine Machinist Certification Tests (M Series)
  • Parts Specialist Certification Tests (P Series)
  • School Bus Certification Tests (S Series)
  • Medium-Heavy Truck Certification Tests (T Series)
  • Undercar Specialist Exhaust Systems Test (X1)
  • ASE Military Tactical Wheeled Vehicle Certification Tests (MIL Series)

There are 17 different Tests Series you can take, and many Tests Series have multiple exams within – in total there are 50 different ASE Certification tests, covering almost every conceivable aspect of the automotive service and repair industry. 

For example, the A-Series, Automobile & Light Truck Certification Tests, is the most common Certification Tests Series, and it contains 8 tests – A1-A9 that cover the following 8 subject areas:

TestASE Series TopicNumber of Questions
A1Engine Repair 50 Questions
A2Transmission & Transaxle50 Questions
A3Drivetrain & Axles 40 Questions
A4Steering & Suspension40 Questions
A5Braking Systems45 Questions
A6Electronic & Electrical50 Questions
A7AC & Heating 50 Questions
A8Engine Performance 50 Questions

Registration Windows

Once you’ve chosen which exams to register for, you should think about the time frame to take the exam.  You may take the test any time of the year, but there are specific registration windows throughout the year to register for the exam.  Once registered, you will have 90 days to take the exam.  The registration windows follow the seasons:

Registration WindowDates
WinterJanuary 10 – March 31
SpringApril 10 – June 30
SummerJuly 10 – September 30
FallOctober 10 – December 31

Cost to register for ASE Exams

As part of registering for the exams, you will pay based on the number of exams you are registering for.  I’ve broken down the entire cost for ASE certification in this article.  

However, the quick summary is the cost of the ASE certification tests is $47 per test plus a single $34 registration fee paid with each order.  For example, taking the A1 and A2 exams would cost 2 x $47 + $34 = $128.  Although the cost seem pricey, it can more than make up in career growth and additional pay.  Some employers even pay for ASE test fees as an added benefit!

We’ve created a handy table below to quickly calculate how much it will cost to register based on the number of tests:

TestNameNumber of questions*Testing timeCost
A1Engine Repair601¼ hours$47
A2Automatic Transmission / Transaxle601¼ hours$47
A3Manual Drive Train and Axles501 hour$47
A4Suspension and Steering501 hour$47
A5Brakes551¼ hours$47
A6Electrical / Electronic Systems601½ hours$47
A7Heating and Air Conditioning601¼ hours$47
A8Engine Performance601¼ hours$47
A9Light Vehicle Diesel Engines601¼ hours$47

Taking the Exam

The day has arrived to take the exam… Step 1: Take a deep breath – you can do this!

Make sure you get plenty of rest the night before the exam.  Everyone prepares for taking tests in their own way, whether it’s relaxing reading the newspaper, last minute cramming of practice test questions, or exercising.  Also, Be sure to read our guide to Test Taking Tips as well because every advantage helps.

Make sure you arrive at the test center on time and make sure you bring a valid Government-issued Identification. The good news is that you won’t have to wait long for your results.  The results will be emailed to you shortly after the test has been completed. 

What percentage is needed to pass the ASE Tests?

In order to pass an ASE exam, you need to score at least a 70% or better.  For example, if you are taking the A1 Engine Repair exam with 50 questions, you need to get 35 questions correct or more to pass.  This means you can only miss 15 questions or less on the exam. 

For an exam with 40 questions (such as A3 – Drivetrain & Axles), you must get 28 questions or more correct.  Put another way, you can miss up to 12 questions and still pass the exam.

What if I fail the ASE Test?

Hopefully you will have passed the ASE exam with flying colors the first time.  However, if not there is no need to worry!  The only requirement is to wait 30 days after the prior attempt to register again and re-take the exam. 

Don’t be too hard on yourself! – even the best technicians in their field can have an off day or get unlucky with the question selection.  The important thing is to keep your eye on the prize of ASE certification and not to give up.  Be sure to utilize our FREE ASE practice tests and look into a recommended study guide, and I have confidence that you’ll be ASE certified in no time!

Congratulations – You’re now ASE Certified!

Now that you’re officially ASE certified, get the most out of your certification by displaying your certificate proudly and ensure your employer and customers are aware of your credentials.  Since there are 50 certifications offered by the ASE, consider tackling another area of expertise within the automotive service industry.

To take your career to the next level, consider additional certifications to achieve ASE Master Technician certification to become part of an elite club.  An ASE Master Technician designation is achieved by successfully certifying on all 8 A-Series, Automobile & Light Truck Certification Tests (A1-A8). 

Those who are able to achieve ASE Master Technician certification will also receive a special ASE Master Technician shoulder insignia patch, wallet I.D. card and a certificate to frame on the wall in your shop.  Master Technicians are considered to be well-rounded experts in automotive repair and service.  Master Technician Certification may be that extra push to land you that promotion, salary bump, or land your next job within the industry.

Hopefully this comprehensive guide has been helpful in providing step-by-step instructions to help you achieve ASE certification.

How much does ASE Certification cost? A Complete Breakdown

You’ve been working hard as an automotive mechanic for the past few years, and you feel you’re ready to take your career to the next level.  You’d like to take the Automotive Service Excellence (ASE) certification tests, but what is the actual cost of the ASE tests?

The cost of the ASE certification tests is $47 per test plus a single $34 registration fee paid with each order.  For example, taking the A1 and A2 exams would cost 2 x $47 + $34 = $128.  Although the cost seem pricey, it can more than make up in career growth and additional pay.  Some employers even pay for ASE test fees as an added benefit!

We’ve created a handy table below to quickly calculate how much it will cost to register based on the number of tests:

# TestsCost per TestReg. FeeTotal Cost
1x $47+ $34$81
2x $47+ $34$128
3x $47+ $34$175
4x $47+ $34$222
5x $47+ $34$269
6x $47+ $34$316

Now that you know the basic costs of ASE tests, you’re probably wondering how many tests are available, how many you should complete.

Cost to become an ASE Certified Master Mechanic

There are over 49 different certifications that are available, but by far the most common certifications are the Automotive / Light Truck Tests.  There are 9 certifications for this category commonly known as A1 – A9.  If an auto mechanic is able to pass all 9 of these certifications then they become an ASE Certified Master Mechanic.  Now let’s look at what the total cost would be to take these exams.

If all 9 tests were to be registered at once, the total cost would be 9 x $47 + $34 = $457.  Although this can seem like a large expense, these certifications can be thought of as an investment.  Many technicians report a pay increase of 20-30% after achieving Master Mechanic certification.  You can see how the costs of the ASE tests will quickly pay for itself.

If you’re looking to study for the ASE test, be sure to take our practice tests and utilize our study guides to ensure you ace the tests. Below is the full list of the A1-A9 tests that are required for ASE Master Mechanic Certification.  The table includes the number of questions, testing time, and cost as well.

TestNameNumber of questions*Testing timeCost
A1Engine Repair601¼ hours$47
A2Automatic Transmission / Transaxle601¼ hours$47
A3Manual Drive Train and Axles501 hour$47
A4Suspension and Steering501 hour$47
A5Brakes551¼ hours$47
A6Electrical / Electronic Systems601½ hours$47
A7Heating and Air Conditioning601¼ hours$47
A8Engine Performance601¼ hours$47
A9Light Vehicle Diesel Engines601¼ hours$47

How much does Recertification (Renewal) Cost?

ASE Certification credentials are valid for five years after passing the test.  When your credentials are about to expire, you may take Recertification tests.  Recertification tests are shorter in both time and number of questions – usually about half the number and length.  The cost of the ASE Recertification tests is $47 for each test plus a single $34 registration fee paid with each order.  For example, taking the A3, A4, and A5 Recertification exams would cost 3 x $47 + $34 = $175. 

BUT HERE IS AN IMPORTANT TIP FOR RECERTIFICATION!!!  For Recertification only, you may take as many recertification tests as you want in a single registration window with a total cost cap of $141 + $34 registration fee = $175.  This means that no matter how many recertification tests are taken, you will not have to pay more than $175.

You may take the re-certification tests even if your credentials are expired – and you definitely want to take the recertification instead of the Initial certification test as they are shorter in number of questions and time.

Because credentials are valid for up to 5 years, to maintain Master Mechanic Certification, all 9 Automotive / Light Truck Tests A1-A9 Recertification tests must be passed every 5 years.  Make sure you register for all recertifications in one window so that you only have to pay $175 (See above Tip!).  Instead of having to pay the cost of all 9 exams is 9 x $47 + $34 = $457, you can pay just $175, which saves you $282 every 5 years!

This why you should definitely ask your employer whether they can reimburse you for ASE Certification tests.  Even if your employer does not cover the costs, an ASE Master Mechanic Certification can help you stand out from other technicians land you that new job.

Reduce Costs by Passing the First Time!

This may sound like a no-brainer, but if you fail the certification tests you will have to pay additional fees to re-take the tests.  You definitely want to avoid this at all costs to save you time and money!

At a cost of $47 per test, the price can quickly add up.  Just how quickly you might ask?  If you are trying to pass all 9 Automotive / Light Truck Tests and you fail them and need to re-test, that could be an additional 9 x $47 + $34 = $457, Ouch!

It only makes sense to take these tests once you are well-prepared and have completed multiple study guides and practice tests.  Definitely take advantage of the resources on this page, including test tips, study guides, and of course the FREE practice test questions.

My own mentors have always recommended that I purchase a set of study guide books to help me prepare, and that was excellent advice.

We have a list of study guides that we recommend that you can find here: https://asecertificationtraining.com/guides/

Special Tests with a Different Fee

There are a few special advanced tests that cost a bit more than the other 49 standard ASE tests.  These tests are for mechanics who have very specific needs or are pursuing advanced certification. 

  • The Advanced Level Tests L1, L2, and L3 cost $94 each
  • The Military Tactical Wheeled Vehicles (TWV) test costs $74 each
  • The Volvo Certified Level Tests costs $94 each

Most mechanics will not end up taking these tests for certification.  They are advanced certifications, and therefore are priced a bit higher than the other standard tests.  However, getting these certifications could be the difference between getting your dream job, so you should consider looking into them.

Below is the full list of the L1-L3 tests, the number of questions, testing time, and cost.

TestNameNumber of questions*Testing timeCost
L1Advanced Engine Performance602½ hours$94
L2Electronic Diesel Engine Diagnosis452 hours$94
L3Light Duty Hybrid/Electric Vehicle552 hours$94

Conclusion

Hopefully you now feel well prepared to take on the ASE certification tests to boost your career growth (and your paycheck!).  Although a cost of $47 per test may seem a little steep, the payoff is well worth it in terms of landing that new job or asking for a raise. 

Once you are able to achieve your ASE Master Mechanic Certification (and any additional certifications), make sure you take advantage of the capped $145 for Recertification that allows you to take as many exams as you want in one registration window.

Test Prep Study Guide Tips & Tricks

Introduction

After receiving an overwhelming number of requests for a study guide, ASE Certification Training HQ has decided to put out a new series on ASE test preparation tips and tricks.

Types of Questions on ASE Exam

Here at ASE Certification Training HQ, we believe that preparation is the key to success, and what better way to prepare than to know what types of questions will be asked on the ASE exam.  There are 5 basic types of questions, and we will cover each of them in the following sections.

The types are:

  • Multiple-Choice Questions
  • EXCEPT Questions
  • Technician A, Technician B Questions
  • Most-Likely Questions
  • Least-Likely Questions

Different people tend to find different types of questions easier than others.  We recommend reviewing the types and seeing which questions you feel most comfortable answering.

ASE certification tests are often thought of as being tricky. They may seem to be tricky if you do not completely understand what is being asked. The following examples will help you recognize certain types of ASE questions and avoid common errors. Each test is made up of forty to eighty multiple-choice questions.

Multiple-choice questions are an efficient way to test knowledge. To answer them correctly, you must think about each choice as a possibility, and then choose the one that best answers the question. To do this, read each word of the question carefully. Do not assume you know what the question is about until you have finished reading it.

About 10 percent of the questions on an actual ASE exam will use an illustration. These drawings contain the information needed to correctly answer the question. The illustration must be studied carefully before attempting to answer the question. Often, techs look at the possible answers then try to match up the answers with the drawing. Always do the opposite; match the drawing to the answers.

When the illustration is showing an electrical schematic or another system in detail, look over the system and try to figure out how the system works before you look at the question and the possible answers.

Multiple-Choice Questions

One type of multiple-choice question has three wrong answers and one correct answer. The wrong answers, however, may be almost correct, so be careful not to jump at the first answer that seems to be correct. If all the answers seem to be correct, choose the answer that is the most correct. If you readily know the answer, this kind of question does not present a problem. If you are unsure of the answer, analyze the question and the answers. For example:

A rocker panel is a structural member of which vehicle construction type?
A. Front-wheel drive
B. Pickup truck
C. Unibody
D. Full-frame

Analysis:
This question asks for a specific answer. By carefully reading the question, you will find that it asks for a construction type that uses the rocker panel as a structural part of the vehicle.

Answer A is wrong. Front-wheel drive is not a vehicle construction type.

Answer B is wrong. A pickup truck is not a type of vehicle construction.

Answer C is correct. Unibody design creates structural integrity by welding parts together, such as the rocker panels, but does not require exterior cosmetic panels installed for full strength.

Answer D is wrong. Full-frame describes a body-over-frame construction type that relies on the frame assembly for structural integrity.

Therefore, the correct answer is C. If the question was read quickly and the words “construction type” were passed over, answer A may have been selected.

EXCEPT Questions

Another type of question used on ASE tests has answers that are all correct except one. The correct answer for this type of question is the answer that is wrong. The word “EXCEPT” will always be in capital letters. You must identify which of the choices is the wrong answer. If you read quickly through the question, you may overlook what the question is asking and answer the question with the first correct statement. This will make your answer wrong. An example of this type of question and the analysis is as follows:

All of the following are tools for the analysis of structural damage EXCEPT: A. height gauge. B. tape measure. C. dial indicator. D. tram gauge.

Analysis:
The question really requires you to identify the tool that is not used for analyzing structural damage. All tools given in the choices are used for analyzing structural damage except one. This question presents two basic problems for the test-taker who reads through the question too quickly. It may be possible to read over the word “EXCEPT” in the question or not think about which type of damage analysis would use answer C. In either case, the correct answer may not be selected. To correctly answer this question, you should know what tools are used for the analysis of structural damage. If you cannot immediately recognize the incorrect tool, you should be able to identify it by analyzing the other choices.

Answer A is wrong. A height gauge may be used to analyze structural damage.

Answer B is wrong. A tape measure may be used to analyze structural damage.

Answer C is correct. A dial indicator may he used as a damage analysis tool for moving parts, such as wheels, wheel hubs, and axle shafts, but would not be used to measure structural damage.

Answer D is wrong. A tram gauge is used to measure structural damage.

Technician A, Technician B Questions

The type of question that is most popularly associated with an ASE test is the “Tech­ nician A says… Technician B says… Who is right?” type. In this type of question, you must identify the correct statement or statements. To answer this type of question correctly, you must carefully read each technician’s statement and judge it on its own merit to determine if the statement is true.

Typically, this type of question begins with a statement about some analysis or repair procedure. This is followed by two statements about the cause of the problem, proper inspection, identification, or repair choices. You are asked whether the first statement, the second statement, both statements, or neither statement is correct. Analyzing this type of question is a little easier than the other types hecause there are only two ideas to consider although there are still four choices for an answer.

Technician A, Technician B questions are really double true or false questions. The best way to analyze this kind of question is to consider each technician’s statement sep­ arately. Ask yourself, is A true or false? Is B true or false? Then select your answer from the four choices. An important point to remember is that an ASE Technician A, Techni­ cian B question will never have Technician A and B directly disagreeing with each other. That is why you must evaluate each statement independently. An example of this type of question and the analysis of it follows.

Structural dimensions are being measured. Technician A says comparing measurements from one side to the other is enough to determine the damage. Technician B says a tram gauge can be used when a tape measure cannot measure in a straight line from point to point. Who is right?

A. A only

B. B only

C. Both A and B

D. Neither A nor B

Analysis:
With some vehicles built asymmetrically, side-to-side measurements are not always equal. The manufacturer’s specifications need to be verified with a dimension chart before reaching any conclusions about the structural damage.

Answer A is wrong. Technician A’s statement is wrong. A tram gauge would provide a point-to-point measurement when a part, such as a strut tower or air cleaner, interrupts a direct line between the points.

Answer B is correct. Technician B is correct. A tram gauge can be used when a tape measure cannot be used to measure in a straight line from point to point.

Answer C is wrong. Since Technician A is not correct, C cannot be the correct answer.

Answer D is wrong. Since Technician B is correct, D cannot be the correct answer.

Most-Likely Questions

Most-likely questions are somewhat difficult because only one choice is correct while the other three choices are nearly correct. An example of a most-likely-cause question is as follows:

The most likely cause of reduced turbocharger boost pressure may be a:

A. westgate valve stuck closed.

B. westgate valve stuck open.

C. leaking westgate diaphragm.

D. disconnected westgate linkage.

Analysis:

Answer A is wrong. A westgate valve stuck closed increases turbocharger boost pressure.

Answer B is correct. A westgate valve stuck open decreases turbocharger boost pressure.

Answer C is wrong. A leaking westgate valve diaphragm increases turbocharger boost pressure.

Answer D is wrong. A disconnected westgate valve linkage will increase turbocharger boost pressure.

LEAST-Likely Questions

Notice that in most-likely questions there is no capitalization. This is not so with LEAST-likely type questions. For this type of question, look for the choice that would be the least likely cause of the described situation. Read the entire question carefully before choosing your answer. An example is as follows:

What is the LEAST likely cause of a bent pushrod?

A. Excessive engine speed

B. A sticking valve

C. Excessive valve guide clearance

D. A worn rocker arm stud

Analysis:

Answer A is wrong. Excessive engine speed may cause a bent pushrod.

Answer B is wrong. A sticking valve may cause a bent pushrod.

Answer C is correct. Excessive vaJve clearance will not generally cause a bent pushrod.

Answer D is wrong. A worn rocker arm stud may cause a bent pushrod.

Next Steps towards ASE Certification

Now that you’re familiar with Heater Cores: Problem Diagnosis, Inspection, Pressure, and Dye Testing, try out our free Automotive Service Excellence Tests to see how much you know!

Tech Tip:  Always Replace the Radiator Pressure Cap

Replacing Old Radiator Caps

Replace the old radiator cap with a new cap with the same pressure rating.  The cap can be located on the following:

  1. Radiator
  2. Coolant recovery reservoir
  3. Upper radiator hose

Warning

Never remove a pressure cap from a hot engine. When the pressure is removed from the system, the coolant will immediately boil and will expand upward, throwing scalding coolant in all directions. Hot coolant can cause serious burns.

Cooling System Hoses

All cooling system hoses should be checked for wear or damage.

Disposing of Used Coolant

Used coolant drained from vehicles should be disposed of according to state or local laws. Some communities permit draining into the sewer. Ethylene glycol will easily biodegrade. There could be problems with groundwater contamination, however, if coolant is spilled on open ground. Check with recycling companies authorized by local or state governments for the exact method recommended for disposal in your area.

Cleaning the Radiator Exterior

Overheating can result from exterior and interior radiator plugging. External plugging is caused by dirt and insects. This type of plugging can be seen if you look straight through the radiator while a light is held behind it. It is most likely to occur on off-road vehicles. The plugged exterior of the radiator core can usually be cleaned with water pressure from a hose. The water is aimed at the engine side of the radiator. The water should flow freely through the core at all locations. If this does not clean the core, the radiator should be removed for cleaning at a radiator shop.

Tech Tip:  Always Use Heater Hoses Designed for Coolant

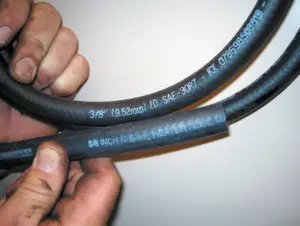
Many heater hoses are sizes that can also be used for other purposes such as oil lines. Always check and use hose that states it is designed for heater or cooling system use.

Heater Hose for Coolant

The top 3/8 in. hose is designed for oil and similar liquids, whereas the 3/8 in. hose below is labeled “heater hose” and is designed for coolant.

Tech Tip:  Quick and Easy Cooling System Problem Diagnosis

  1. If overheating occurs in slow stop-and-go traffic, the usual cause is low airflow through the radiator. Check for airflow blockages or cooling fan malfunction.
  2. If overheating occurs at highway speeds, the cause is usually a radiator or coolant circulation problem. Check for a restricted or clogged radiator.

Next Steps towards ASE Certification

Now that you’re familiar with Heater Cores: Problem Diagnosis, Inspection, Pressure, and Dye Testing, try out our free Automotive Service Excellence Tests to see how much you know!

Cooling System Service

Flushing Coolant

Flushing the cooling system includes the following steps.

  • STEP 1 Drain the system (dispose of the old coolant correctly).
  • STEP 2 Fill the system with clean water and flushing/cleaning chemical.
  • STEP 3 Start the engine until it reaches operating temperature with the heater on.
  • STEP 4 Drain the system and fill with clean water.
  • STEP 5 Repeat until drain water runs clear (any remaining flush agent will upset pH).
  • STEP 6 Fill the system with 50/50 antifreeze/water mix or premixed coolant.
  • STEP 7 Start the engine until it reaches operating temperature with the heater on.
  • STEP 8 Adjust coolant level as needed.

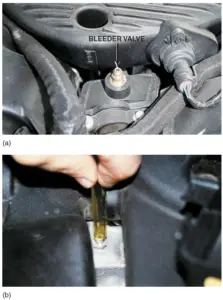
Bleeding the air out of the cooling system is important because air can prevent proper operation of the heater and can cause the engine to overheat. Use a clear hose attached to the bleeder valve and the other end in a “suitable” container. This prevents coolant from getting on the engine and gives the technician a visual clue as to the color of coolant.

Check service information for specific bleeding procedures and location of the air bleeder fittings.

Bleeder Valve Refilling Coolant System

(a) Many vehicle manufacturers recommend that the bleeder valve be opened whenever refilling the coolant system. (b) Chrysler recommends that a clear plastic hose (1/4 in. ID) be attached to the bleeder valve and directed into a suitable container to keep from spilling coolant onto the ground and on the engine and to allow the technician to observe the flow of coolant for any remaining oil bubbles.

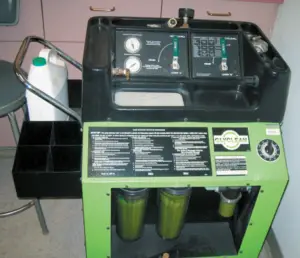
Coolant Exchange Machine

Many coolant exchange machines are able to perform one or more of the following operations.

  • Exchange old coolant with new coolant
  • Flush the cooling system
  • Pressure or vacuum check the cooling system for leaks

The use of a coolant exchange machine pulls a vacuum on the cooling system which helps illuminate air pockets from forming during coolant replacement. If an air pocket were to occur, the following symptoms may occur.

  1. Lack of heat from the heater. Air rises and can form in the heater core, which will prevent coolant from flowing.

Overheating. The engine can overheat due to the lack of proper coolant flow through the system. Always follow the operating instructions for the coolant exchange machine being used.

Coolant Exchange Machine

Using a coolant exchange machine helps eliminate the problem of air getting into the system which can cause overheating or lack of heat due to air pockets getting trapped in the system.

Hose Inspection

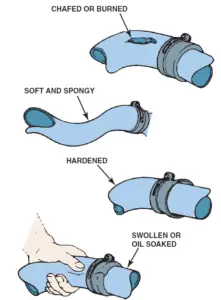
Coolant system hoses are critical to engine cooling. As the hoses get old, they become either soft or brittle and sometimes swell in diameter. Their condition depends on their material and on the engine service conditions. If a hose breaks while the engine is running, all coolant will be lost. A hose should be replaced any time it appears to be abnormal.

  • HINT: To make hose removal easier and to avoid possible damage to the radiator, use a utility knife and slit the hose lengthwise. Then simply peel the hose off.

The hose and hose clamp should be positioned so that the clamp is close to the bead on the neck. This is especially important on aluminum hose necks to avoid corrosion. When the hoses are in place and the drain petcock is closed, the cooling system can be refilled with the correct coolant mixture.

Next Steps towards ASE Certification

Now that you’re familiar with Heater Cores: Problem Diagnosis, Inspection, Pressure, and Dye Testing, try out our free Automotive Service Excellence Tests to see how much you know!

Coolant Temperature Warning Lights & Coolant System Inspection

Coolant System Warning Light Purpose & Function

Most vehicles are equipped with a heat sensor for the engine operating temperature indicator light. If the warning light comes on during driving (or the temperature gauge goes into the red danger zone), then the coolant temperature is about 250°F to 258°F (120°C to 126°C), which is still below the boiling point of the coolant (assuming a properly operating pressure cap and system).

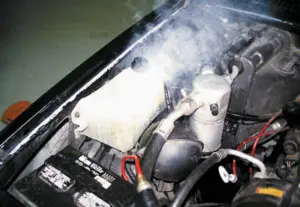
Overheated Engine Coolant Overflow

When an engine overheats, often the coolant overflow container boils.

Precautions

If the coolant temperature warning light comes on, follow these steps.

  • STEP 1 Shut off the air conditioning and turn on the heater. The heater will help rid the engine of extra heat. Set the blower speed to high.
  • STEP 2 If possible, shut the engine off and let it cool. (This may take over an hour.)
  • STEP 3 Never remove the radiator cap when the engine is hot.
  • STEP 4 Do not continue to drive with the hot light on, or serious damage to your engine could result.
  • STEP 5 If the engine does not feel or smell hot, it is possible that the problem is a faulty hot light sensor or gauge. Continue to drive, but to be safe, stop occasionally and check for any evidence of overheating or coolant loss.

Common Causes of Overheating

Overheating can be caused by defects in the cooling system, such as the following:

  1. Low coolant level
  2. Plugged, dirty, or blocked radiator
  3. Defective fan clutch or electric fan
  4. Incorrect ignition timing (if adjustable)
  5. Low engine oil level
  6. Broken fan drive belt
  7. Defective radiator cap
  8. Dragging brakes
  9. Frozen coolant (in freezing weather)
  10. Defective thermostat
  11. Defective water pump (the impeller slipping on the shaft internally)
  12. Blocked cooling passages in the block or cylinder head(s)

Real World Fix:  Highway Overheating

A vehicle owner complained of an overheating vehicle, but the problem occurred only while driving at highway speeds. The vehicle, equipped with a 4-cylinder engine, would run in a perfectly normal manner in city driving situations.

The technician flushed the cooling system and replaced the radiator cap and the water pump, thinking that restricted coolant flow was the cause of the problem. Further testing revealed coolant spray out of one cylinder when the engine was turned over by the starter with the spark plugs removed.

A new head gasket solved the problem. Obviously, the head gasket leak was not great enough to cause any problems until the engine speed and load created enough flow and heat to cause the coolant temperature to soar.

The technician also replaced the oxygen (O2) sensor, because the IAT-type coolant contains phosphates and silicates that often contaminate the sensor. The deteriorated oxygen sensor could have contributed to the problem.

Cooling System Inspection

Coolant Level

The cooling system is one of the most maintenance-free systems in the engine. Normal maintenance involves an occasional check on the coolant level. It should also include a visual inspection for signs of coolant system leaks and for the condition of the coolant hoses and fan drive belts.

  1. CAUTION: The coolant level should only be checked when the engine is cool. Removing the pressure cap from a hot engine will release the cooling system pressure while the coolant temperature is above its atmospheric boiling temperature. When the cap is removed, the pressure will instantly drop to atmospheric pressure level, causing the coolant to boil immediately. Vapors from the boiling liquid will blow coolant from the system. Coolant will be lost, and someone may be injured or burned by the high-temperature coolant that is blown out of the filler opening.

Accessory Drive Belt Tension

Drive belt condition and proper installation are important for the proper operation of the cooling system.

There are four ways vehicle manufacturers specify that the belt tension is within factory specifications.

  1. Belt tension gauge. A belt tension gauge is needed to achieve the specified belt tension. Install the belt and operate the engine with all of the accessories turned on, to run in the belt for at least five minutes. Adjust the tension of the accessory drive belt to factory specifications. The proper tension is based on the size of the belt. Replace any serpentine belt that has more than three cracks in any one rib that appears in a 3 in. span.
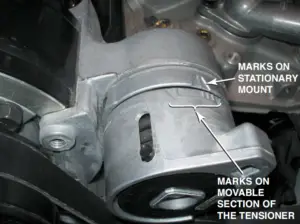
  2. Marks on the tensioner. Many tensioners have marks that indicate the normal operating tension range for the accessory drive belt. Check service information for the location of the tensioner mark.
  3. Torque wrench reading. Some vehicle manufacturers specify that a beam-type torque wrench be used to determine the torque needed to rotate the tensioner. If the torque reading is below specifications, the tensioner must be replaced.
  4. Depress the belt between the two pulleys that are the farthest apart and the flex or deflection should be 1/2 in.

Typical Marks on an accessory Drive Belt Tensioner

Typical marks on an accessory drive belt tensioner.


Tech Tip:  The Water Spray Trick

Lower-than-normal alternator output could be the result of a loose or slipping drive belt. All belts (V and serpentine multigroove) use an interference angle between the angle of the Vs of the belt and the angle of the Vs on the pulley. A belt wears this interference angle off the edges of the V of the belt. As a result, the belt may start to slip and make a squealing sound even if tensioned properly.

A common trick to determine if the noise is from the belt is to spray water from a squirt bottle at the belt with the engine running. If the noise stops, the belt is the cause of the noise. The water quickly evaporates and therefore, water just finds the problem—it does not provide a short-term fix.

Next Steps towards ASE Certification

Now that you’re familiar with Heater Cores: Problem Diagnosis, Inspection, Pressure, and Dye Testing, try out our free Automotive Service Excellence Tests to see how much you know!

Heater Cores: Problem Diagnosis, Inspection, Pressure, and Dye Testing

Heater Cores Purpose and Function

Most of the heat absorbed from the engine by the cooling system is wasted. Some of this heat, however, is recovered by the vehicle heater. Heated coolant is passed through tubes in the small core of the heater. Air is passed across the heater fins and is then sent to the passenger compartment. In some vehicles, the heater and air conditioning work in series to maintain vehicle compartment temperature.

Heater Problem Diagnosis

When the heater does not produce the desired amount of heat, many owners and technicians replace the thermostat before doing any other troubleshooting. It is true that a defective thermostat is the reason for the engine not to reach normal operating temperature, but there are many other causes besides a defective thermostat that can result in lack of heat from the heater. To determine the exact cause, follow this procedure.

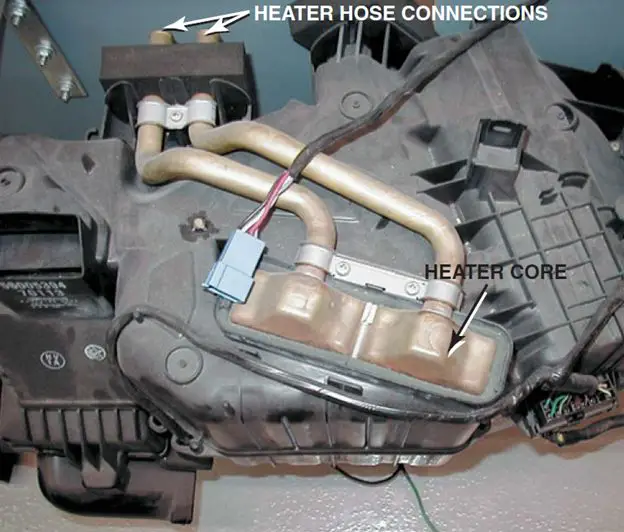
Heater Core Installed in a HVAC Housing Assembly

A typical heater core installed in a heating, ventilation, and air-conditioning (HVAC) housing assembly.

STEP 1

After the engine has been operated, feel the upper radiator hose. If the engine is up to proper operating temperature, the upper radiator hose should be too hot to hold. The hose should also be pressurized.

  1. If the hose is not hot enough, replace the thermostat.
  2. If the hose is not pressurized, test or replace the radiator pressure cap if it will not hold the specified pressure.
  3. If okay, see step 2.

STEP 2

With the engine running, feel both heater hoses. (The heater should be set to the maximum heat position.) Both hoses should be too hot to hold. If both hoses are warm (not hot) or cool, check the heater control valve for proper operation (if equipped). If one hose is hot and the other (return) is just warm or cool, remove both hoses from the heater core or engine and flush the heater core with water from a garden hose.

STEP 3

If both heater hoses are hot and there is still a lack of heating concern, then the fault is most likely due to an airflow blend door malfunction. Check service information for the exact procedure to follow.

HINT: Heat from the heater that “comes and goes” is most likely the result of low coolant level. Usually with the engine at idle, there is enough coolant flow through the heater. At higher engine speeds, however, the lack of coolant through the heads and block prevents sufficient flow through the heater.

Cooling System Testing

Visual Inspection

Many cooling system faults can be found by performing a thorough visual inspection. Items that can be

inspected visually include:

  • Water pump drive belt for tension or faults
  • Cooling fan for faults
  • Heater and radiator hoses for condition and leaks
  • Coolant overflow or surge tank coolant level
  • Evidence of coolant loss
  • Radiator condition

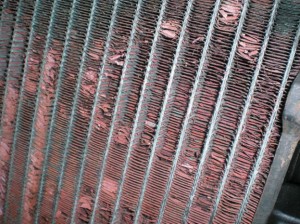
Corroded Rusted Radiator from Overheating Vehicle

A heavily corroded radiator from a vehicle that was overheating. A visual inspection discovered that the corrosion had eaten away many of the cooling fins, yet did not leak. This radiator was replaced and it solved the overheating problem.

Pressure Testing

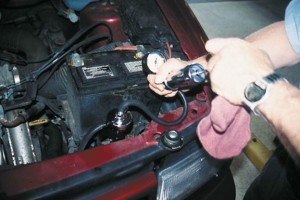
Pressure testing using a hand-operated pressure tester is a quick and easy cooling system test. The radiator cap is removed (engine cold!) and the tester is attached in the place of the radiator cap. By operating the plunger on the pump, the entire cooling system is pressurized.

  • CAUTION: Do not pump up the pressure beyond that specified by the vehicle manufacturer. Most systems should not be pressurized beyond 14 PSI (100 kPa). If a greater pressure is used, it may cause the water pump, radiator, heater core, or hoses to fail.

If the cooling system is free from leaks, the pressure should stay and not drop. If the pressure drops, look for evidence of leaks anywhere in the cooling system, including:

  1. Heater hoses
  2. Radiator hoses
  3. Radiator
  4. Heater core
  5. Cylinder head
  6. Core plugs in the side of the block or cylinder head

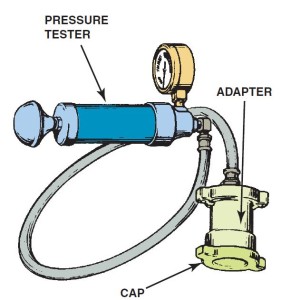
Pressure Tester for Cooling System Diagnosis

The pressure cap should be checked for proper operation using a pressure tester as part of the cooling system diagnosis.

Pressure testing should be performed whenever there is a leak or suspected leak. The pressure tester can also be used to test the radiator cap. An adapter is used to connect the pressure tester to the radiator cap. Replace any cap that will not hold pressure.

Pressure Testing of a Car Engine under the Hood

Pressure testing should be performed whenever there is a leak or suspected leak.

Coolant Dye Leak Testing

One of the best methods to check for a coolant leak is to use a fluorescent dye in the coolant, one that is specifically designed for coolant. Operate the vehicle with the dye in the coolant until the engine reaches normal operating temperature. Use a black light to inspect all areas of the cooling system. When there is a leak, it will be easy to spot because the dye in the coolant will be seen as bright green. Pressure testing the cooling system. A typical hand-operated pressure tester applies pressure equal to the radiator cap pressure. The pressure should hold; if it drops, this indicates a leak somewhere in the cooling system. An adapter is used to attach the pump to the cap to determine if the radiator can hold pressure, and release it when pressure rises above its maximum rated pressure setting.

Coolant Leak Checking Dye Black Light

Use dye specifically made for coolant when checking for leaks using a black light.

Next Steps towards ASE Certification

Now that you’re familiar with Heater Cores: Problem Diagnosis, Inspection, Pressure, and Dye Testing, try out our free Automotive Service Excellence Tests to see how much you know!

Coolant Flow in the Engine

Types of Systems

Coolant flows through the engine in one of the following ways.

  • Parallel flow system. In the parallel flow system, coolant flows into the block under pressure and then crosses the head gasket to the head through main coolant passages beside each cylinder.
  • Series flow system. In the series flow system, the coolant flows around all the cylinders on each bank. All the coolant flows to the rear of the block, where large main coolant passages allow the coolant to flow across the head gasket. The coolant then enters the rear of the heads. In the heads, the coolant flows forward to a crossover passage on the intake manifold outlet at the highest point in the engine cooling passage. This is usually located at the front of the engine. The outlet is either on the heads or in the intake manifold.
  • Series-parallel flow system. Some engines use a combination of these two coolant flow systems and call it a seriesparallel flow system. Any steam that develops will go directly to the top of the radiator. In series flow systems, bleed holes or steam slits in the gasket, block, and head perform the function of letting out the steam.

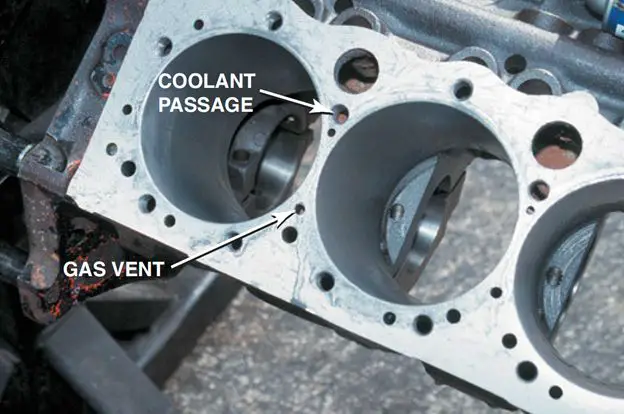
Chevy V8 Block Coolant Holes Head Gasket

A Chevrolet V-8 Block that shows the large coolant holes and the smaller gas vent or bleed holes that must match the head gasket when the engine is assembled.

Coolant Flow and Head Gasket Design

Most V-type engines use cylinder heads that are interchangeable side to side, but not all engines. Therefore, based on the design of the cooling system and flow through the engine, it is very important to double check that the cylinder head is matched to the block and that the head gasket is installed correctly (end for end) so that all of the cooling passages are open to allow the proper flow of coolant through the system.

Cooling Fans

Electronically Controlled Cooling Fan

Two types of electric cooling fans used on many engines include:

  • One two-speed cooling fan
  • Two cooling fans (one for normal cooling and one for high heat conditions)

The PCM commands low-speed fans on under the following conditions.

  • Engine coolant temperature (ECT) exceeds approximately 223°F (106°C).
  • A/C refrigerant pressure exceeds 190 PSI (1,310 kPa).
  • After the vehicle is shut off, the engine coolant temperature at key-off is greater than 284°F (140°C) and system voltage is more than 12 volts. The fan(s) will stay on for approximately three minutes.

The PCM commands the high-speed fan on under the following conditions.

  • Engine coolant temperature (ECT) reaches 230°F (110°C).
  • A/C refrigerant pressure exceeds 240 PSI (1,655 kPa).
  • Certain diagnostic trouble codes (DTCs) set.


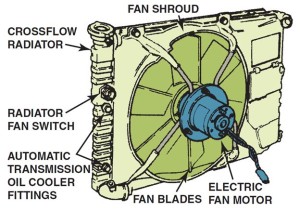
Electric Cooling Fan Assembly Radiator

A typical electric cooling fan assembly showing the radiator and related components.

To prevent a fan from cycling on and off excessively at idle, the fan may not turn off until the ignition switch is moved to the off position or the vehicle speed exceeds approximately 10 mph (16 km/h).

Many rear-wheel-drive vehicles and all transverse engines drive the fan with an electric motor.

  • NOTE: Most electric cooling fans are computer controlled. To save energy, most cooling fans are turned off whenever the vehicle is traveling faster than 35 mph (55 km/h). The ram air caused by the vehicle speed is enough to keep the radiator cool. Of course, if the computer senses that the temperature is still too high, the computer will turn on the cooling fan, to “high,” if possible, in an attempt to cool the engine to avoid severe engine damage.

Warning: Some electric cooling fans can come on after the engine is off without warning. Always keep hands and fingers away from the cooling fan blades unless the electrical connector has been disconnected to prevent the fan from coming on. Always follow all warnings and cautions.

Thermostatic Fins

On some rear-wheel-drive vehicles, a thermostatic cooling fan is driven by a belt from the crankshaft. It turns faster as the engine turns faster. Generally, the engine is required to produce more power at higher speeds. Therefore, the cooling system will also transfer more heat. Increased fan speed aids in the required cooling. Engine heat also becomes critical at low engine speeds in traffic where the vehicle moves slowly. The thermostatic fan is designed so that it uses little power at high engine speeds and minimizes noise. Two types of thermostatic fans include:

  • Silicone coupling. The silicone coupling fan drive is mounted between the drive pulley and the fan. HINT: When diagnosing an overheating problem, look carefully at the cooling fan. If silicone is leaking, then the fan may not be able to function correctly and should be replaced.
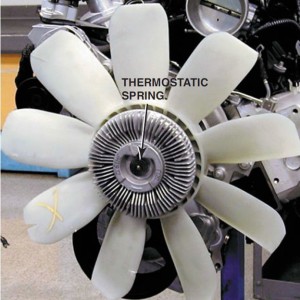
  • Thermostatic spring. A second type of thermal fan has a thermostatic spring added to the silicone coupling fan drive. The thermostatic spring operates a valve that allows the fan to freewheel when the radiator is cold. As the radiator warms to about 150°F (65°C), the air hitting the thermostatic spring will cause the spring to change its shape. The new shape of the spring opens a valve that allows the drive to operate like the silicone coupling drive. When the engine is very cold, the fan may operate at high speeds for a short time until the drive fluid warms slightly. The silicone fluid will then flow into a reservoir to let the fan speed drop to idle.

Engine Driven Thermostatic Spring Cooling Fins

A typical engine-driven thermostatic spring cooling fins

The fan is designed to move enough air at the lowest fan speed to cool the engine when it is at its highest coolant temperature. The fan shroud is used to increase the cooling system efficiency.

Tech Tip: Be Sure to Always Use a Fan Shroud

A fan shroud forces the fan to draw air through the radiator. If a fan shroud is not used, then air is drawn from around the fan and will reduce the airflow through the radiator. Many overheating problems are a result of not replacing the factory shroud after engine work or body repair work to the front of the vehicle.

Next Steps towards ASE Certification

Now that you’re familiar with Coolant Flow in the Engine, try out our free Automotive Service Excellence Tests to see how much you know!