![ASE Certification Training HQ - Free ASE Practice Tests [Updated 2021]](https://asecertificationtraining.com/wp-content/themes/simplefolio/images/ASE Certification Logo.png)

Coolant Temperature Warning Lights & Coolant System Inspection
Coolant System Warning Light Purpose & Function
Most vehicles are equipped with a heat sensor for the engine operating temperature indicator light. If the warning light comes on during driving (or the temperature gauge goes into the red danger zone), then the coolant temperature is about 250°F to 258°F (120°C to 126°C), which is still below the boiling point of the coolant (assuming a properly operating pressure cap and system).
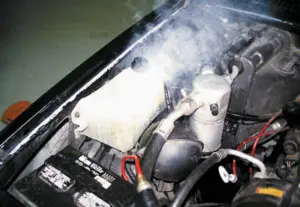
When an engine overheats, often the coolant overflow container boils.
Precautions
If the coolant temperature warning light comes on, follow these steps.
- STEP 1 Shut off the air conditioning and turn on the heater. The heater will help rid the engine of extra heat. Set the blower speed to high.
- STEP 2 If possible, shut the engine off and let it cool. (This may take over an hour.)
- STEP 3 Never remove the radiator cap when the engine is hot.
- STEP 4 Do not continue to drive with the hot light on, or serious damage to your engine could result.
- STEP 5 If the engine does not feel or smell hot, it is possible that the problem is a faulty hot light sensor or gauge. Continue to drive, but to be safe, stop occasionally and check for any evidence of overheating or coolant loss.
Common Causes of Overheating
Overheating can be caused by defects in the cooling system, such as the following:
- Low coolant level
- Plugged, dirty, or blocked radiator
- Defective fan clutch or electric fan
- Incorrect ignition timing (if adjustable)
- Low engine oil level
- Broken fan drive belt
- Defective radiator cap
- Dragging brakes
- Frozen coolant (in freezing weather)
- Defective thermostat
- Defective water pump (the impeller slipping on the shaft internally)
- Blocked cooling passages in the block or cylinder head(s)
Real World Fix: Highway Overheating
A vehicle owner complained of an overheating vehicle, but the problem occurred only while driving at highway speeds. The vehicle, equipped with a 4-cylinder engine, would run in a perfectly normal manner in city driving situations.
The technician flushed the cooling system and replaced the radiator cap and the water pump, thinking that restricted coolant flow was the cause of the problem. Further testing revealed coolant spray out of one cylinder when the engine was turned over by the starter with the spark plugs removed.
A new head gasket solved the problem. Obviously, the head gasket leak was not great enough to cause any problems until the engine speed and load created enough flow and heat to cause the coolant temperature to soar.
The technician also replaced the oxygen (O2) sensor, because the IAT-type coolant contains phosphates and silicates that often contaminate the sensor. The deteriorated oxygen sensor could have contributed to the problem.
Cooling System Inspection
Coolant Level
The cooling system is one of the most maintenance-free systems in the engine. Normal maintenance involves an occasional check on the coolant level. It should also include a visual inspection for signs of coolant system leaks and for the condition of the coolant hoses and fan drive belts.
- CAUTION: The coolant level should only be checked when the engine is cool. Removing the pressure cap from a hot engine will release the cooling system pressure while the coolant temperature is above its atmospheric boiling temperature. When the cap is removed, the pressure will instantly drop to atmospheric pressure level, causing the coolant to boil immediately. Vapors from the boiling liquid will blow coolant from the system. Coolant will be lost, and someone may be injured or burned by the high-temperature coolant that is blown out of the filler opening.
Accessory Drive Belt Tension
Drive belt condition and proper installation are important for the proper operation of the cooling system.
There are four ways vehicle manufacturers specify that the belt tension is within factory specifications.
- Belt tension gauge. A belt tension gauge is needed to achieve the specified belt tension. Install the belt and operate the engine with all of the accessories turned on, to run in the belt for at least five minutes. Adjust the tension of the accessory drive belt to factory specifications. The proper tension is based on the size of the belt. Replace any serpentine belt that has more than three cracks in any one rib that appears in a 3 in. span.
- Marks on the tensioner. Many tensioners have marks that indicate the normal operating tension range for the accessory drive belt. Check service information for the location of the tensioner mark.
- Torque wrench reading. Some vehicle manufacturers specify that a beam-type torque wrench be used to determine the torque needed to rotate the tensioner. If the torque reading is below specifications, the tensioner must be replaced.
- Depress the belt between the two pulleys that are the farthest apart and the flex or deflection should be 1/2 in.
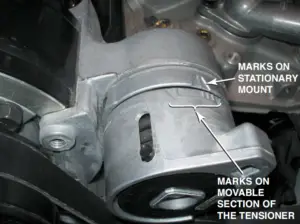
Typical marks on an accessory drive belt tensioner.
Tech Tip: The Water Spray Trick
Lower-than-normal alternator output could be the result of a loose or slipping drive belt. All belts (V and serpentine multigroove) use an interference angle between the angle of the Vs of the belt and the angle of the Vs on the pulley. A belt wears this interference angle off the edges of the V of the belt. As a result, the belt may start to slip and make a squealing sound even if tensioned properly.
A common trick to determine if the noise is from the belt is to spray water from a squirt bottle at the belt with the engine running. If the noise stops, the belt is the cause of the noise. The water quickly evaporates and therefore, water just finds the problem—it does not provide a short-term fix.
Next Steps towards ASE Certification
Now that you’re familiar with Heater Cores: Problem Diagnosis, Inspection, Pressure, and Dye Testing, try out our free Automotive Service Excellence Tests to see how much you know!